
Support

Get to Know the PocketCloud App

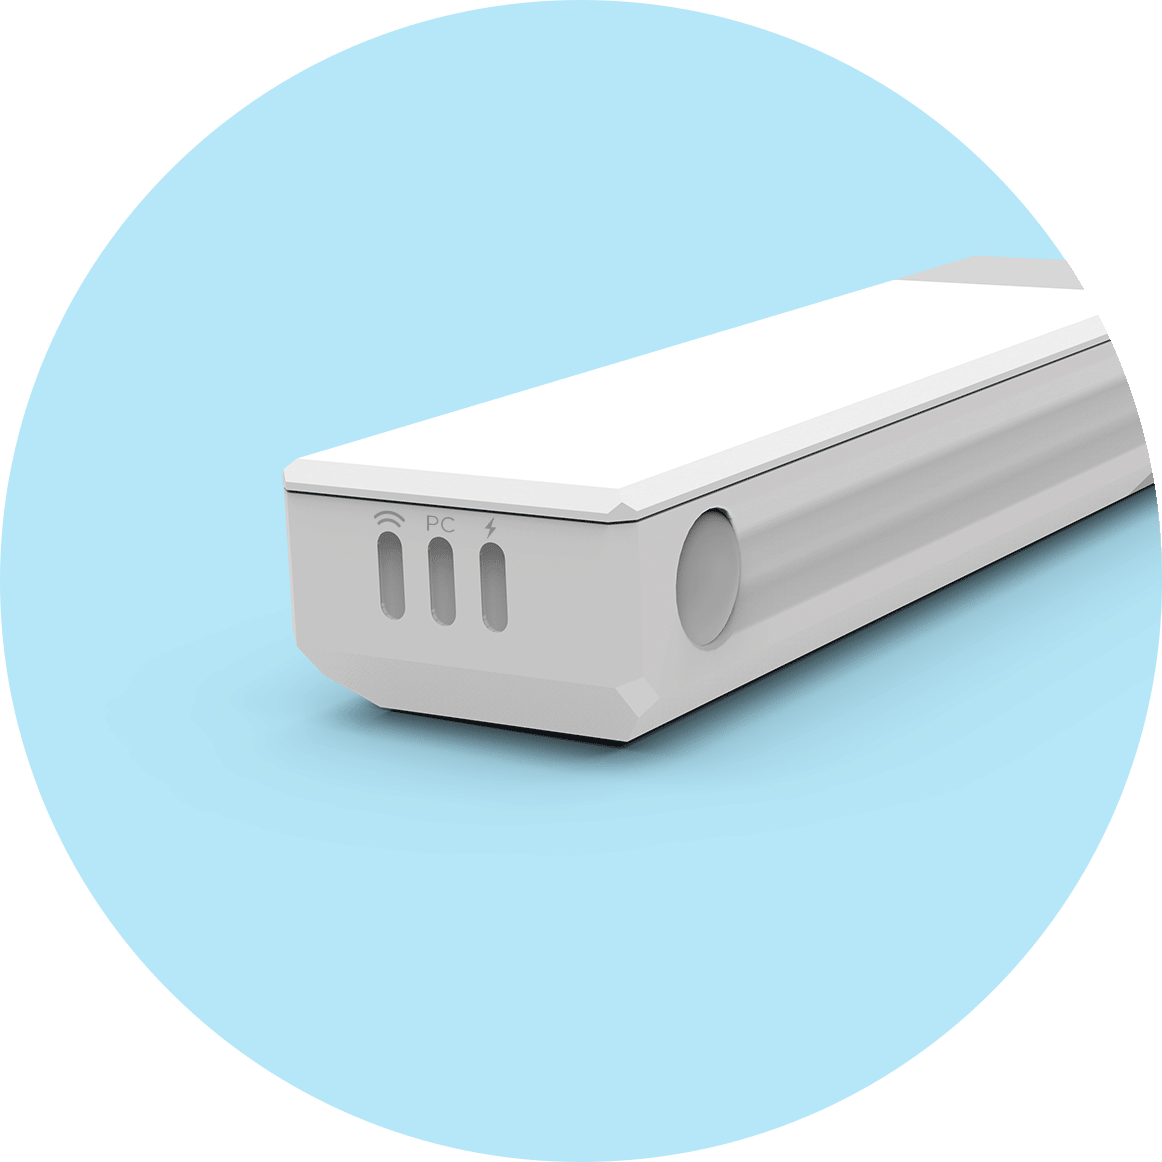
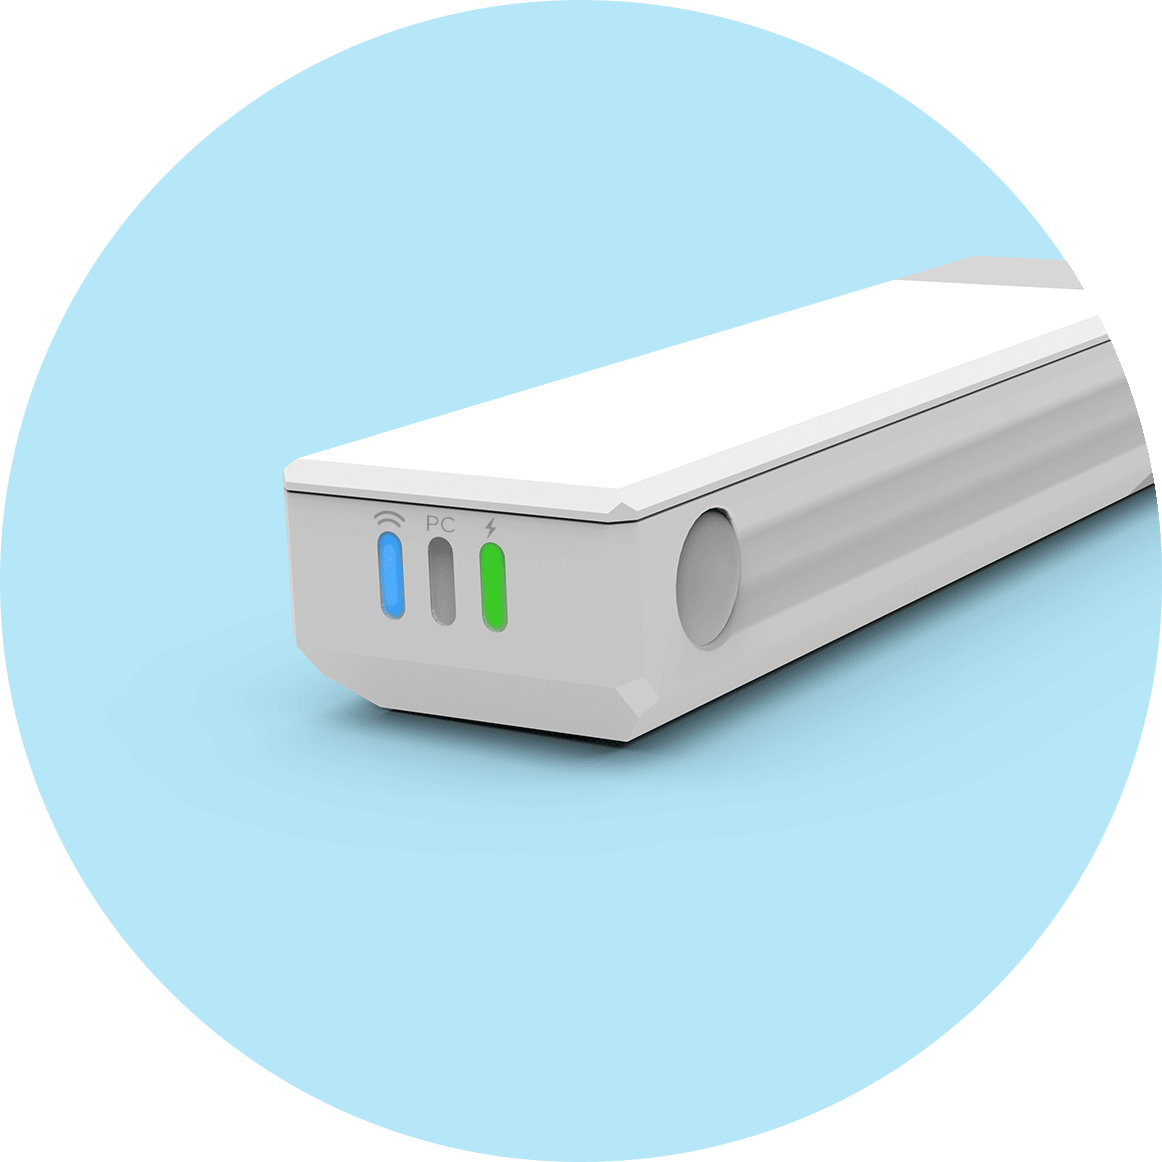
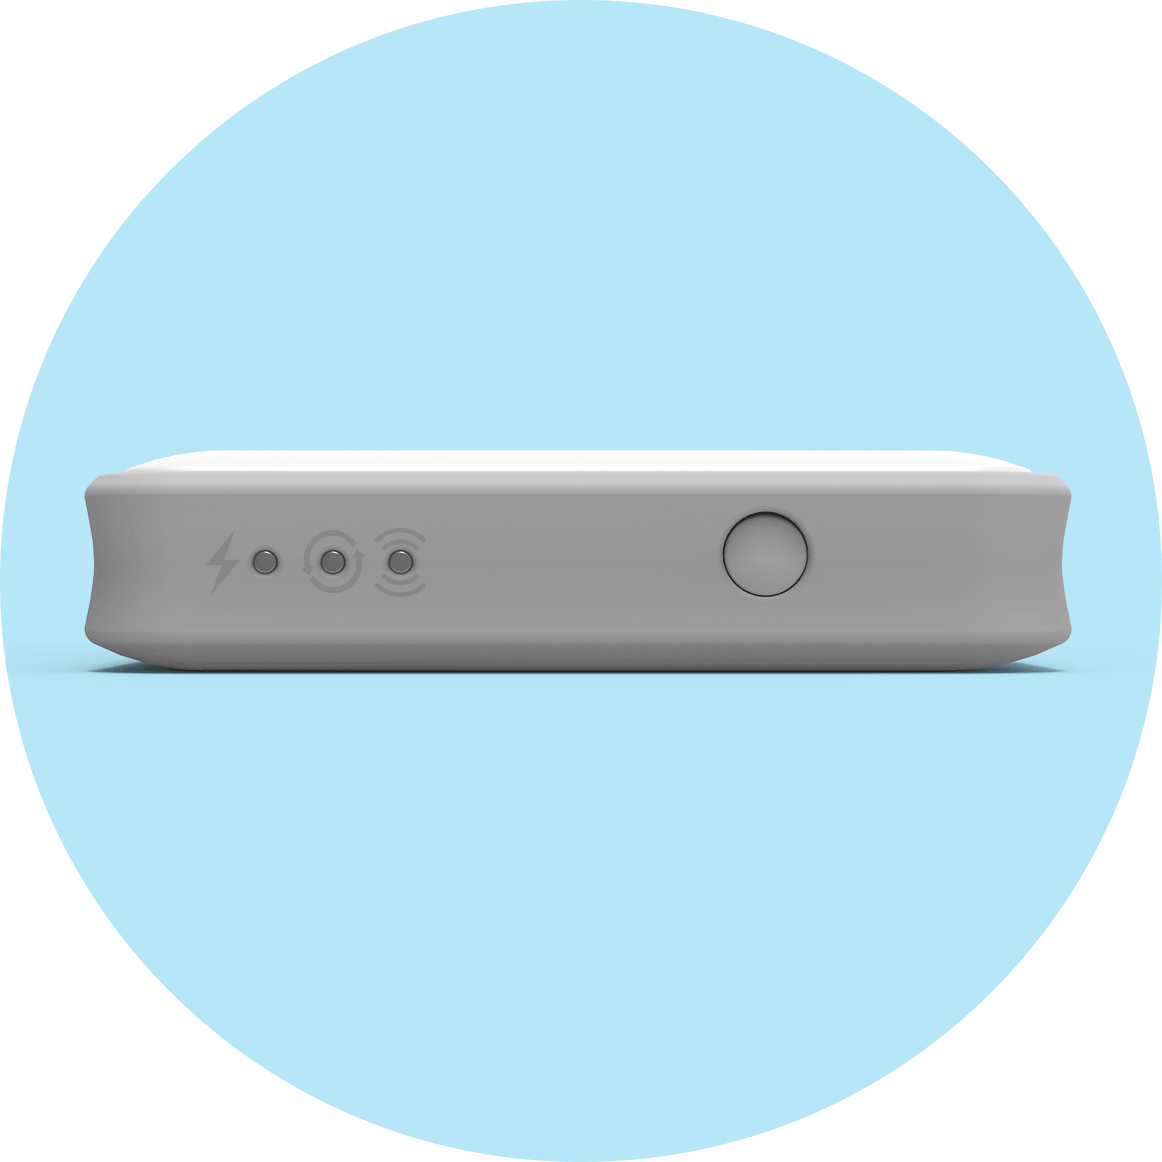
CloudStick Light Legend


QUICKSTART
Ways to Use CloudStick
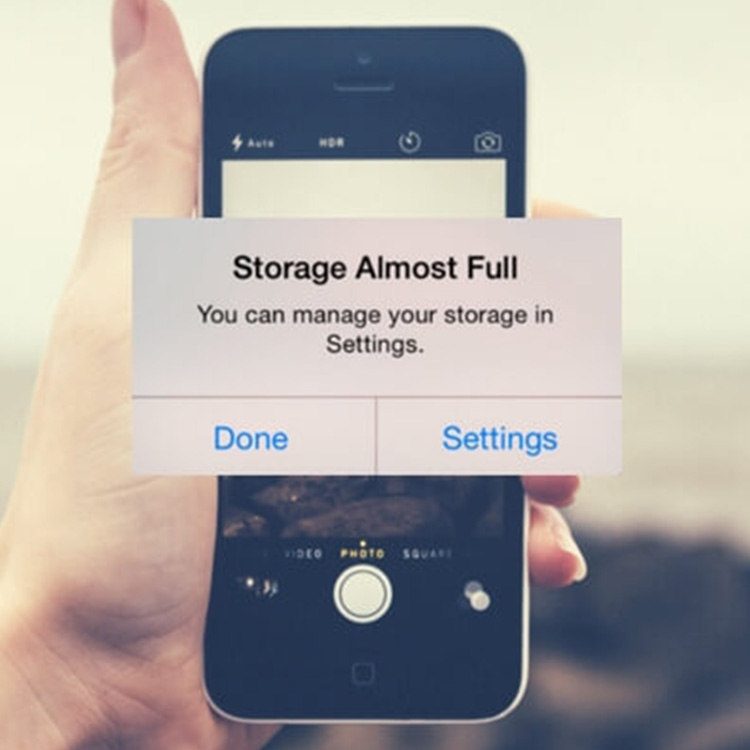
Free up space on your phone or tablet.

Share photos & other files with friends & family.
Backup your files to the CloudStick to keep your memories safe.

Take photos from within the app & bypass your phone or tablet to save them directly to the CloudStick.

Save files from your computer to bring them with you on the go.
Always keep your most important files close at hand.
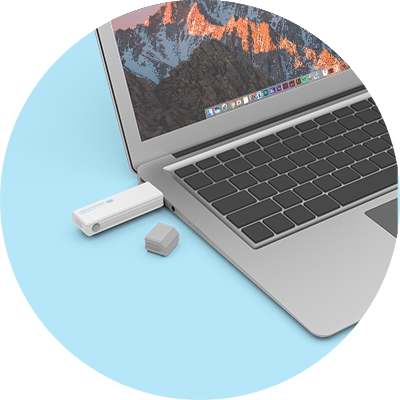
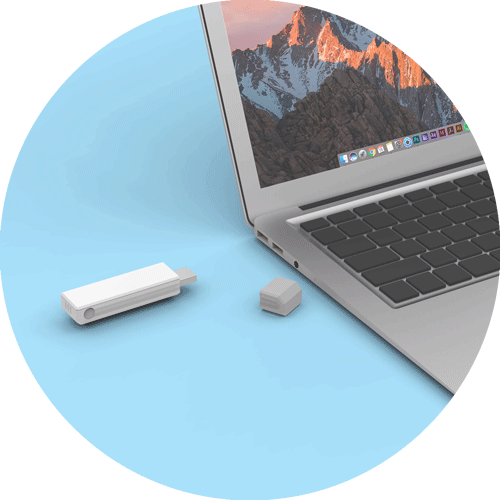
A. Download the “PocketCloud” app from iTunes or Google Play.
![]()
![]()
B. Turn the CloudStick on by pressing the power button on the side of the unit.
C. Go into the Wi-Fi settings on your device.
D. Choose “CloudStick” from the list of available Wi-Fi networks.
E. Enter the password to connect to theCloudStick. The default password is 12345678. This can be changed at any time. (See Advanced Section 9A.ii. (Apple) or 9A.iv. (Android) to learn how.) Important to note: This is disconnecting you from your standard WiFi network and connecting you to your CloudStick network. To be connected to both, you can bridge your standard WiFi. (See Advanced Section 9A.i. (Apple) or 9A.ii. (Android) to learn how.) Up to 7 devices can connect to the CloudStick simultaneously.
VPNs can affect your phone’s ability to connect to the CloudStick network. If you are having trouble connecting, try disabling the VPN to see if that is causing the issue.
F. Open the PocketCloud app.
Android Users: Once the PocketCloud app is opened to the home screen, look at the Browse PocketCloud icon and it should be blue and white. If it is grey and white, force close and reopen the app to re-establish the connection. (See Advanced Section 1D for more troubleshooting tips.)

H. The app may ask for permission to access the files on your device. (If it does not ask for permission at this moment, it may ask later on when you click on one of the main icons on the home screen.) Tap “OK”. If you “Don’t Allow” you will get an alert when you try to use the app telling you that you have not given permission. If this occurs, you must go into the settings on your phone or tablet and give permission.

Transferring files to your CloudStick
CloudStick is the perfect companion for your smartphone or tablet. Free up space on your device by wirelessly transferring files to CloudStick. Once transferred to CloudStick, they are no longer taking up space on your device and are still easily accessible using the app from your smartphone or tablet.
Wi-Fi Mode is the default mode that your CloudStick is in when it is connected to your device. This is the mode you must be in to transfer files to your CloudStick from your device and vice versa.
Important to note: The screenshots below depict the design of the PocketCloud app for Apple devices (iPhones/iPads). If you are operating this app on an Android device, there may be slight differences in the wording and graphics.

A. Browse Phone
Open the homepage of the PocketCloud app and tap the “Browse iPhone” or “Browse Android Device” icon. This gives you access to all of the files on your phone or tablet that are available to be stored on your CloudStick.

B. Folders
The app has default folders set up to help organize the media on your device that can be stored on your CloudStick. There will be a default folder for music, videos, photos and files downloaded from your CloudStick to your mobile device. Tap on the folder you want to open.

C. Selecting Files
Apple Users: Tap the menu button in the top right corner of the screen and tap “Select”. Tap “Select All” or select the individual files you want to move.
Android Users: Tap the “Select Files” button at the bottom of the screen to select files manually. Tap the menu button in the top right corner of the screen and tap “Select All” if you want to select all of the files.

D. Uploading Files
Once you have all of the files selected that you want to save, tap the menu button then tap “Upload” (Apple) or tap the “Upload
Viewing and transferring files from your CloudStick
Wi-Fi Mode is the default mode that your CloudStick is in when it is connected to your device. This is the mode you must be in to transfer files to your CloudStick from your device and vice versa.
Files can also be saved from the CloudStick to your mobile device. Up to seven devices can be connected to the CloudStick simultaneously, making CloudStick the easiest way to share photos and videos with family and friends.
Important to note: The screenshots below depict the design of the PocketCloud app for Apple devices (iPhones/iPads). If you are operating this app on an Android device, there may be slight differences in the wording and graphics.

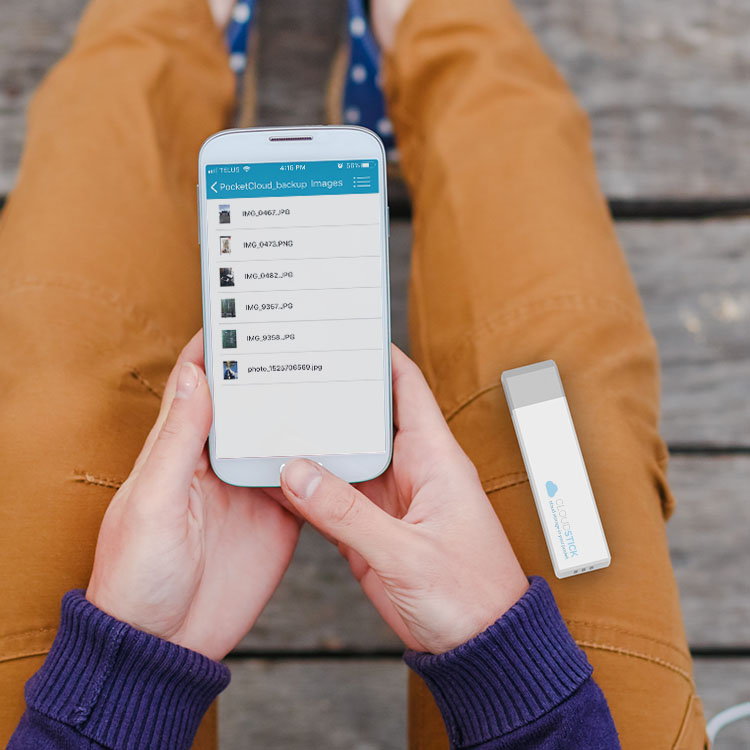
A. Browse PocketCloud
Open the homepage of the PocketCloud app and tap the “Browse PocketCloud” icon. This gives you access to all of the files on your CloudStick.

B. Folders
The app has a default folder set up called “PocketCloud Backup” for the files that have been saved onto the CloudStick. Tap on this folder and you will have access to the default folders for audio, videos and images saved on your CloudStick.

C. Viewing Files
Once you have entered the folder of the media you want to view or save, you will see a list of all of your files. Tap the menu button in the top right corner and tap “Select” (Apple) or tap “Select Files” at the bottom of the screen (Android). You will now have the option to copy the files, rename them, save them and more. See Advanced Section 9C (Apple) or 9B (Android) for a breakdown of the different options in the “Browse PocketCloud” menu.

D. Downloading Files
One you have selected the files you want to download to your device, tap the menu button. Tap “Download” and the files will be saved to the default location on your device for that file type.
A. The CloudStick also allows you to save files to and from your computer. This can be done in Transfer Mode.
B. Turn the CloudStick on.
C. Take the cap off of the CloudStick and plug it into a computer or laptop.
D. Press the power button on the CloudStick once to switch from the standard WiFi Mode to Transfer Mode. You will know you are in Transfer Mode because the centre light will illuminate with white light.
E. On your computer, the CloudStick will appear as a device just like a standard USB drive. You can view the files that are saved on your CloudStick, as well as save them to your computer. You can also drag and drop files from your computer onto your CloudStick.
Saving new photos directly to your CloudStick
CloudCam is a feature in the PocketCloud app that allows you to take photos and save them directly to the CloudStick. With the CloudCam, the photos bypass your device completely, saving space on your device and eliminating the step of transferring photos to your CloudStick later.
Important to note: The screenshots below depict the design of the PocketCloud app for Apple devices (iPhones/iPads). If you are operating this app on an Android device, there may be slight differences in the wording and graphics.

A. CloudCam
Open the homepage of the PocketCloud app and tap the “CloudCam” icon to open the camera.

B. Take the Photo
Use the camera to take a video or photo.

C. Save the Photo
On and Android, the photo will save directly to your device’s photo gallery. On an Apple device, once you have taken the photo, you will have the option to either retake or use the photo or video. Tap “Use Photo” and the photo will be saved directly to your CloudStick.
ADVANCED
A. Download the App
i. Download the “PocketCloud” app from iTunes or Google Play.
![]()
![]()
B. Turn Your CloudStick On C. Connecting Your CloudStick to Your Device D. Troubleshooting when Your CloudStick is Not Connected E. Reset Your CloudStick F. Turn Your CloudStick Off
i. Turn on your CloudStick by pressing the power button on the side of the unit.
ii. The battery light (rightmost of the three lights on the side of the PocketCloud) will illuminate green and the WiFi light (leftmost of the three lights) will light up blue.
i. Open the WiFi settings on your device.
ii. Choose “CloudStick” from the list of available networks.
iii. Enter the password. The default password is 12345678 and can be changed at any time. (See Advanced Section 9A.ii. (Apple) or 9A.iv. (Android) to learn how.)
Important to note: This is disconnecting you from your standard WiFi network and connecting you to your CloudStick network. To be connected to both, you can bridge your standard WiFi. (See Advanced Section 9A.i. (Apple) or 9A.ii. (Android) to learn how.) Up to 7 devices can connect to the CloudStick simultaneously.
VPNs can affect your phone’s ability to connect to the CloudStick network. If you are having trouble connecting, try disabling the VPN to see if that is causing the issue.
iv. Open the PocketCloud app.
v. Apple Users: Once the PocketCloud app is opened to the home screen, look to the top centre of the screen and you should see the words “Connected To PocketCloud”. If it says, “Not Connected”, this is likely because the app was opened before you connected to your CloudStick. Simply force close and reopen the app and you should be connected. (See Advanced Section 1D for more troubleshooting tips.)
Android Users: Once the PocketCloud app is opened to the home screen, look at the Browse PocketCloud icon and it should be blue and white to indicate that the CloudStick is connected. If it is grey and white, this indicates that the CloudStick is not connected. This is likely because the app was opened before you connected to your CloudStick. Simply force close and reopen the app and you should be connected. (See Advanced Section 1D for more troubleshooting tips.)
vi. A window may pop up to ask for permission for the PocketCloud app to access the files on your device. This window may pop up when you first open the app, or may pop up later on when you tap on a home screen icon or folder.
vii. Tap “OK”. (If you “Don’t Allow”, the CloudStick will not be able to access the files on your device for you to save them on your CloudStick. When you open the PocketCloud app, you will get an alert when you try to use the app telling you that you have not given permission. If this occurs, you must go into the settings on your phone or tablet and give permission.)
If when you open your PocketCloud app, you see the words “Not Connected” or the Browse PocketCloud icon is greyed out, here are some actions you can take to reconnect:
• (Android Only) Clear Cache: Tap the menu button in the top right corner of the home screen. Tap “Clear Cache”.
• Refresh the connection: Tap the menu button in the top right corner of the home screen. Tap “Refresh”.
• Restart the app: Force close and re-open the PocketCloud app.
• Reconnect the WiFi: Enter your WiFi settings and disconnect from the CloudStick WiFi. Turn the WiFi off for about a minute and then turn it back on. Re-connect to the CloudStick WiFi (See Advanced Section 1C to learn how).
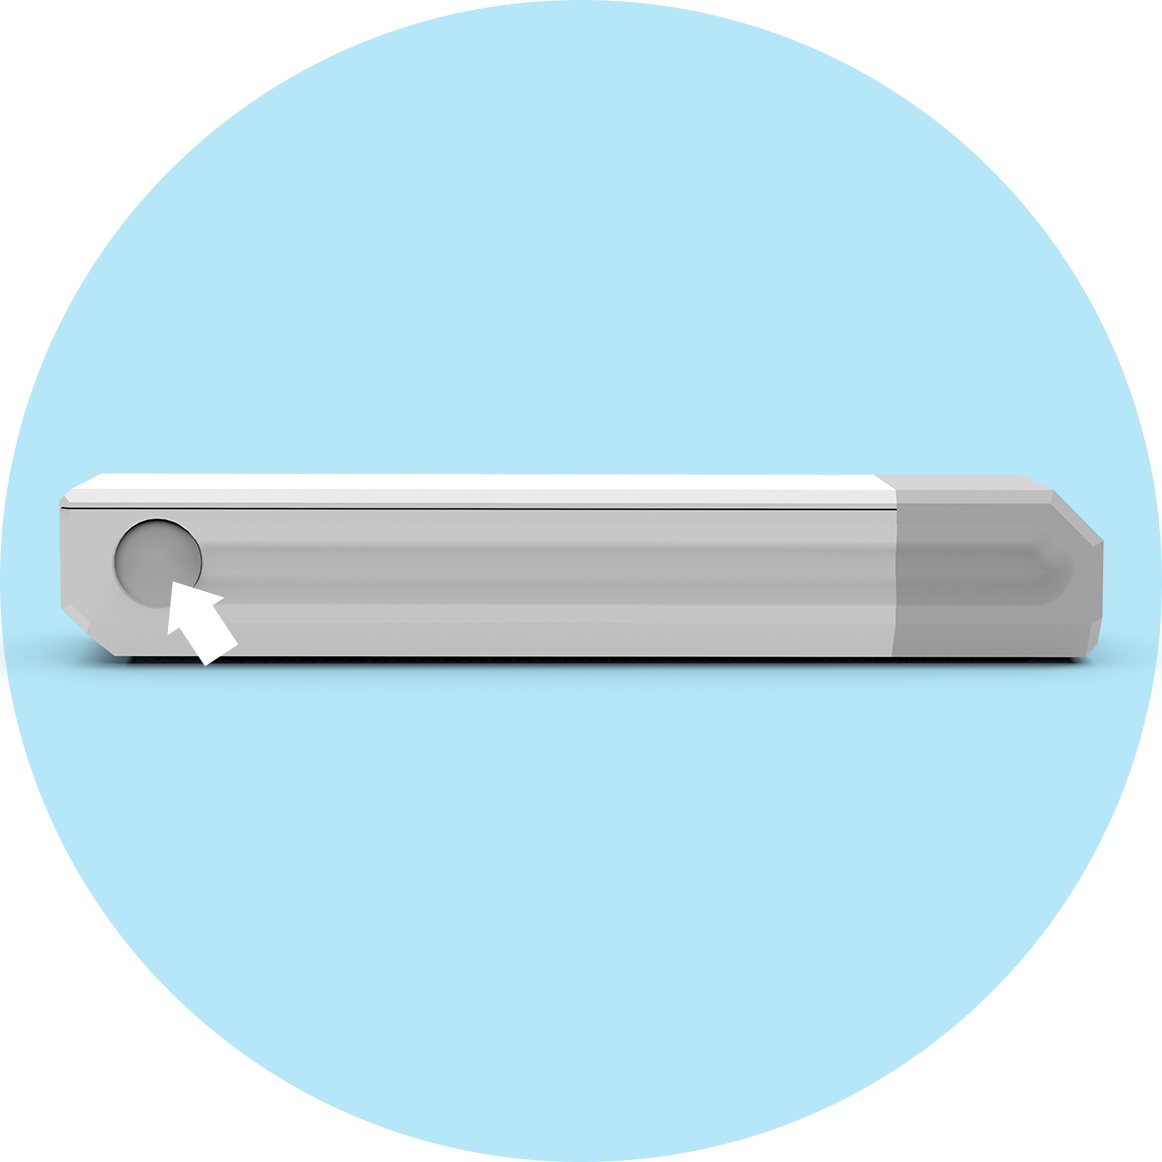
i. On the side of the CloudStick there is a small hole.
ii. Insert a paper clip (or another slim object) into the hole and press until you feel a click. Remove the paper clip.
iii. Press the power button to turn the CloudStick back on.
iv. Your CloudStick WiFi password will be reset back to the default “12345678”. You can change this password at any time. (See Advanced Section 9A.ii. (Apple) or 9A.iv. (Android) to learn how.)
i. Press and hold the power button on the CloudStick for approximately 10 seconds.
ii. Once you let go of the power button, the battery light will flash green twice and all three lights will turn off to indicate the CloudStick is off.
Wifi Mode is the default mode that your CloudStick is in when it is connected to your device. It connects your CloudStick to your device through the CloudStick WiFi signal. (See Advanced Section 1C to learn how.)
• Save files from your device to your CloudStick. (See Advanced Section 4C to learn how.)
• Save files from your CloudStick to your device. (See Advanced Section 5C to learn how.)
• View files on your CloudStick.
• Do a full backup of the files on your device to your CloudStick. (See Advanced Section 8 to learn more about the full backup.)
• Up to 7 devices can connect to the CloudStick simultaneously via WiFi.
B. Uses for WiFi Mode
• Free up space on your device by saving files to the CloudStick and deleting them from the device.
• Make sure all of your files are safe by backing them up on the CloudStick.
• Share files with other devices. You can save files onto the CloudStick so that another user can connect their device and save the same files for themselves. (See Advanced Section 5F to learn how.)
C. Turn On WiFi Mode
i. Turn the CloudStick on by pressing the power button on the side of the CloudStick.
ii. The CloudStick will automatically be in WiFi Mode.
D. Switching Modes
• You can only be in one mode at a time. Switch from WiFi Mode to Transfer Mode by plugging your CloudStick into a computer and pressing the power button once. The Transfer Mode light will illuminate white.
• To switch from Transfer Mode back to WiFi Mode while your CloudStick is plugged in, press the power button once again. The Transfer Mode light will turn off.
• Once you unplug the CloudStick from your computer, it will automatically switch back to WiFi Mode.
A. What is Transfer Mode?
Transfer Mode is the mode that you must be in when you want to use your computer with your CloudStick.
• Save files from your computer to your CloudStick. (See Advanced Section 6 to learn more about how to use your CloudStick with your computer.)
• Save files from your CloudStick to your computer.
• View files on your CloudStick.
B. Uses for Transfer Mode
• Backup files from your computer to your CloudStick.
• Easily save files on the CloudStick from your computer so that you can share them with others later in WiFi Mode.
• View files on your CloudStick on a larger screen.
• Organize the files on the CloudStick quickly.
C. Turn on Transfer Mode
i. While powered on, plug the CloudStick into a computer via the USB end.
ii. Press the power button on the CloudStick once.
iii. The Transfer Mode light (centre light on the side of the CloudStick) will illuminate white to indicate that Transfer Mode is on.
D. Switching Modes
• You can only be in one mode at a time. Switch from WiFi Mode to Transfer Mode by plugging your CloudStick into a computer and pressing the power button once. The Transfer Mode Light will illuminate white.
• To switch from Transfer Mode back to WiFi Mode while your CloudStick is plugged in, press the power button once again. The Transfer Mode light will turn off.
• Once you unplug the CloudStick from your computer, it will automatically switch back to WiFi Mode.
A. Browse Phone
• The “Browse iPhone”/”Browse Android Device” section lets you look through all of the files on your device that are compatible to be saved on the CloudStick.
• This includes photos, audio files, videos and more.
• You can select files and save them on the CloudStick. (See Advanced Section 4C to learn how.)
• You can also do a full back-up of the files from your device to your CloudStick. (See Advanced Section 8 to learn more about the full backup.)
B. Viewing Files on Your Device
i. Open the PocketCloud app.
ii. Tap the “Browse iPhone” or “Browse Android Device” icon.
iii. The CloudStick creates default folders to help organize the files on your device. You can also create your own custom folders. (See Advanced Section 9C.vi. (Apple) or 9B.ii. (Android) to learn how.)
iv. Tap the folder of the media you want to browse. This brings you into the folder so you can see all of the available files of that type that are on your device.
v. Tap the individual files to view them at full screen and click or swipe through them.
C. Saving Files from Your Device to Your CloudStick
i. Follow Step B. Viewing Files on Your Device i-v.
ii. Tap the menu button in the top right corner of the screen.
iii. Apple Users: Tap the menu button in the top right corner of the screen and tap “Select”. Tap “Select All” or select the individual files you want to move.
Android Users: Tap the “Select Files” button at the bottom of the screen to select files manually. Tap the menu button in the top right corner of the screen and tap “Select All” if you want to select all of the files.
iv. Once you have selected all of the files you want to save, tap the “Upload Selected Files” button on the bottom of the screen (Android) or tap the menu button and then tap “Upload” (Apple). The files that you save to your CloudStick will still be on your phone or tablet. If you want to delete the files from your phone or tablet, this has to be done outside of the PocketCloud app.
v. The app will automatically bring you into the Browse PocketCloud section.
vi. Select the folder that you want to save the file in.
vii. From here, you can tap “Cancel” in the top left corner to stop saving the selected files or you can tap “Done” in the top right corner to finish saving the files
A. Browse PocketCloud
• Browse PocketCloud lets you look through all of the files that have been saved on your CloudStick.
• This includes photos, audio files, videos and more.
• You can select files and save them to your device. (See Advanced Section 5C to learn how.)
B. Viewing Files on Your Device
i. Open the PocketCloud app.
ii. Tap “Browse PocketCloud”.
iii. The CloudStick has a main default folder called “PocketCloud_backup” to store the files that are saved on your CloudStick. Within that folder, default folders are set up to help organize the files on your phone or tablet. (You can create your own custom folders as well. See Advanced Section 9C.vi. (Apple) or 9B.ii. (Android) to learn how.)
iv. Tap the folder of the media you want to view. This brings you into the folder so you can see all of the files of that type that are on your CloudStick.
v. Tap the individual files to view them at full screen and click or swipe through them.
C. Saving Files from Your CloudStick to Your Device
i. Follow Step B. Viewing Files on Your Device i-v.
ii. Tap the menu button in the top right corner of the screen.
iii. Apple Users: Tap the menu button in the top right corner of the screen and tap “Select”. Tap “Select All” or select the individual files you want to move.
Android Users: Tap the “Select Files” button at the bottom of the screen to select files manually. Tap the menu button in the top right corner of the screen and tap “Select All” if you want to select all of the files.
iv. Once you have selected all of your files, tap the menu button then tap “Download” (Apple) or tap the “Download Selected Files” button at the bottom of the screen (Android).
v. The files that you save to your device will still be on your CloudStick until you delete them (if desired). To see the files, exit the PocketCloud app and go into the applicable music/photo/video/etc storage app.
vi. You can also copy files, rename them and more. (See Advanced Section 9C (Apple) or 9B (Android) for a breakdown of the different options in the “Browse PocketCloud” menu.)
D. Deleting Files from the CloudStick
i. Follow Step B. Viewing Files on Your Device i-v.
ii. Tap the menu button in the top right corner of the screen.
iii. Apple Users: Tap the menu button in the top right corner of the screen and tap “Select”. Tap “Select All” or select the individual files you want to move.
Android Users: Tap the “Select Files” button at the bottom of the screen to select files manually. Tap the menu button in the top right corner of the screen and tap “Select All” if you want to select all of the files.
iv. Tap the menu button again.
v. Tap “Delete”.
E. Moving Files in Your CloudStick
i. Follow Step B. Viewing Files on Your Device i-v.
ii. Apple Users: Tap the menu button in the top right corner of the screen and tap “Select”. Tap “Select All” or select the individual files you want to move.
Android Users: Tap the “Select Files” button at the bottom of the screen to select files manually. Tap the menu button in the top right corner of the screen and tap “Select All” if you want to select all of the files.
iii. Tap the menu button and tap “Copy” if you want to keep a copy of the file in its current folder and add a duplicate to another folder.
iv. Apple Users: Tap “Cut” if you want to remove the file from this folder and put it in another folder.
v. Once you have tapped “Copy” or “Cut”, select the folder you want to place the files in.
vi. Apple Users: Tap “Done” to finish moving the files.
Android Users: Tap the menu button then tap “Paste” to finish moving the files.
F. Sharing Files with Other Devices
i. To share files with other devices using the CloudStick, you must first save the files to the CloudStick.
• To save files from your device to your CloudStick follow Step B. Viewing Files on Your Device i-v and Step C. Saving Files from Your CloudStick to Your Device i-vii.
• To save files from your computer to your CloudStick see Advanced Section 6.
ii. Once you have saved the files on your CloudStick, connect the device you want to share the files with to your CloudStick. (See Advanced Section 1C to learn how.)
iii. Once the device is connected, the user can save the files onto their CloudStick. (See Advanced Section 4C to learn how.)
A. Using CloudStick with Your Computer
Not only can your CloudStick connect to and transfer files with your mobile devices, it can do the same with a computer or laptop.
B. Connecting Your CloudStick to Your Computer
i. Turn the CloudStick on by pressing the power button on the side of the unit.
ii. Remove the cap from your CloudStick and plug the USB end into your computer’s USB port.
iii. Put the CloudStick in Transfer Mode (see Advanced Section 3C to learn how) by pressing the power button once. The Transfer Mode light will illuminate white.
iv. Once Transfer Mode is turned on, WiFi Mode is automatically turned off and you will not be able to view CloudStick files through the app until WiFi Mode is back on.
C. Viewing CloudStick Files on Your Computer
i. Follow Step B. Connecting Your CloudStick to Your Computer i-v.
ii. Your CloudStick will show up on your computer as a device (it will appear in the same location as a standard USB would). This location varies depending on your computer or laptop model.
iii. Select the CloudStick from the list of devices and you will see the same folder options that you see when you tap Browse PocketCloud in the PocketCloud app. (See Advanced Section 5 to learn more about the “Browse PocketCloud” section.)
iv. The standard default folders will be there for you to browse through, as well as any other folders you have created on the CloudStick. (See Advanced Section 9C.vi (Apple) or 9B.iii. (Android) to learn how.)
D. Transferring Files Between Your CloudStick and Your Computer
i. Follow Step B. Connecting Your CloudStick to Your Computer i-iv.
ii. Follow Step C. Viewing CloudStick Files on Your Computer ii-iv.
iii. You can now drag and drop (or manually save) files from your computer into the folder of your choice on the CloudStick.
iv. You can also copy or move files from the CloudStick to your desktop or other folders on your computer.
E. Organizing CloudStick Files on Your Computer
• You can organize the files on your CloudStick through your computer.
• Some people may choose to organize their CloudStick files this way if they prefer working on a larger screen or with a computer keyboard.
• Create new folders as well as rename folders and individual files.
A. CloudCamera
CloudCam allows you to take photos and videos from within the PocketCloud app and save them directly to the CloudStick. This helps save space on your device and eliminates the step of transferring the photos from your device to your CloudStick.
B. Taking a Photo/Video
i. Open the PocketCloud app.
ii. Tap the “CloudCamera” icon.
iii. Use the CloudCam like you would use your device’s standard camera.
iv. Apple Users: Once you have taken your photo or video, you can choose to “Retake” or “Use Photo”.
v. Apple Users: Tap “Retake” to go back to the camera without saving the image you just took.
vi. Apple Users: Tap “Use Photo” to save the photo directly to the default images folder on your CloudStick.
vii. Android Users: Once you have taken your photo or video, it will save directly to your device’s photo gallery.
A. Backup to PocketCloud
• Creates a back-up copy of all of the compatible files on your device and saves them to the CloudStick.
• All videos, photos and audio files will be automatically selected and saved.
• You can also select individual files to back-up on your CloudStick if you do not want to save everything at once. (See Advanced Section 4C to learn how.)
• Important to note: Backing up your phone or tablet can take multiple hours depending on how many files are being backed up, it is best to do this during a time where you will not be needing your device (ex. overnight).
B. Backing Up All of Your Files
i. Open the PocketCloud app.
ii. Tap “Backup to PocketCloud”.
iii. The backup immediately starts.
iv. A window will pop up to show you how many files are being backed up and which file is being backed up at that time.
C. Stopping the Backup
i. While your files are being backed up on the CloudStick, tap anywhere on the app screen.
ii. The “Interrupt backup?” menu will pop up.
iii. Tap “Yes” and the backup will stop.This does not cancel the backup completely, it stops it where it is. Any files that have already been backed up will stay on your CloudStick until you decide to delete them. (See Advanced Section 9C.vii. (Apple) or 9B.vii. (Android) to learn how to delete files from your CloudStick.)
D. Running the Backup in the Background
If you would still like to use your PocketCloud app while your device is backing up, you can run the backup in the background of the app.
i. While your device is backing up, tap anywhere on the screen and the “Interrupt backup?” menu will pop up.
ii. Tap “Background Transmission” and a USB icon will pop up in the bottom right corner of the app’s home screen.
iii. You can continue using your PocketCloud app as desired.
iv. To open the backup screen again, tap the USB icon in the bottom right corner of the home screen.
Apple Device Settings

A. Home Page Menu
i. Bridge WiFi
• Tap “Bridge WiFi” to connect your device to your standard WiFi, along with your CloudStick WiFi.
ii. Change Password
• Tap “Change Password” to change the WiFi password of your CloudStick.
• You will have to enter your old password as well as the new password.
• Tap “Done”.
• If you have forgotten your password, you can reset it to the default password. (See Advanced Section 1E to learn how.)
iii. Refresh
• Tap “Refresh” to reload the page you are viewing.

B. Browse iPhone Menu
i. Refresh
• Tap “Refresh” to reload the page you are viewing.
ii. Select
• Tap “Select” to select the files you want to delete or upload to the CloudStick.
iii. Upload
• Tap “Upload” once you have selected all the files that you want to upload to the CloudStick.
• Once “Upload” is tapped, the files will save directly to the applicable folder on your CloudStick.
iv. Delete
• Tap “Delete” once you have selected all the files that you want to delete from this folder.
• You will only have the option to delete files from the “Downloads from PocketCloud” folder on your device.
• Files that were saved to your device already must be deleted outside the PocketCloud app.

C. Browse PocketCloud Menu
i. Refresh
• Tap “Refresh” to reload the page you are viewing.
ii. Select
• Tap “Select” to select the files you want to delete or upload to the CloudStick.
iii. Copy
• Tap “Copy” once you have selected all the files that you want to make a copy of and move to a different folder on your CloudStick.
iv. Cut
• Tap “Cut” once you have selected all the files that you want to remove from the current folder and move to a different folder on your CloudStick.
v. Rename
• Tap “Rename” once you have selected all the files whose name you want to change.
• This can only be done with one file at a time.
vi. New Folder
• Tap “New Folder” to create and name a new folder on your CloudStick.
vii. Delete
• Tap “Delete” once you have selected all the files that you want to delete from this folder on your CloudStick.
viii. Download
• Tap “Download” once you have selected all the files that you want to download to your device.
• Once “Download” is tapped, the files will save directly to the applicable area on your device.
Android Device Settings

A. Home Page Menu
i. Refresh
• Tap “Refresh” to reload the page you are viewing.
ii. Connect Internet
• Tap “Connect Internet” to connect your device to your standard WiFi, along with your CloudStick WiFi.
iii. Clear Cache
• Tap “Clear Cache” to clear the PocketCloud app’s cache.
• This is another way to reset the PocketCloud app.
iv. Change Password
• Tap “Change Password” to change the WiFi password of your CloudStick.
• You will have to enter your old password as well as the new password.
• Tap “Done”.
• If you have forgotten your password, you can reset it to the default password.(See Advanced Section 1E to learn how.)
v. Transfer Manager

B. Browse Android Device & Browse PocketCloud Menus
i. Refresh
• Tap “Refresh” to reload the page you are viewing.
ii. Select All
• Tap “Select All” to select all of the files in the folder you are in.
iii. Create New Folder
• Tap “Create New Folder” to create and name a new folder on your CloudStick or Android Device.
iv. Copy
• Tap “Copy” once you have selected all the files that you want to make a copy of and move to a different folder on your CloudStick.
v. Paste
• Once you have copied one or more files, tap “Paste” to move the file to the folder you are in.
vi. Rename
• Tap “Rename” once you have selected all the files whose name you want to change.
• This can only be done with one file at a time.
vii. Delete
• Tap “Delete” once you have selected all the files that you want to delete from this folder.
• You will only have the option to delete files from the “Downloads from PocketCloud” folder on your device.
• Files that were saved to your device already must be deleted outside the PocketCloud app.
viii. Cancel
• Tap “Cancel” to deselect files that have been selected, or to cancel an action that you are in the middle of.
A. Charging Your CloudStick
i. Remove the cap from your CloudStick and plug the micro USB end into any USB charging port (ex. on a laptop, computer, wall adapter, etc).
ii. The CloudStick will automatically start charging.
iii. The battery light (the leftmost light on the side of the CloudStick) will flash green to indicate that the CloudStick is charging.
iv. When CloudStick has finished charging, the battery light will be solid green.
FAQ
The CloudStick can connect to 7 different devices simultaneously. An example of how this could benefit you is if you are at an event where a group of people are all taking pictures. You could all connect to the CloudStick and save your pictures to one folder. Then everyone could upload the folder onto their device and have everyone’s different pictures from the event.
• On the side of the CloudStick there is a small hole.
• Insert a paper clip (or another slim object) into the hole and press until you feel a click. Remove the paper clip.
• Press the power button to turn the CloudStick back on.
• Your CloudStick WiFi password will be reset back to the default “12345678”. You can change this password at any time. (See Advanced Section 9A.ii. (Apple) or 9A.iv. (Android) to learn how.)
• Open the PocketCloud app.
• Tap the menu button in the top left corner of the homescreen.
• Tap “Bridge WiFi” to connect your device to your standard WiFi, along with your CloudStick WiFi
Yes. If you have the option to allow the PocketCloud app to have access to the files on your device or tablet, you should do this. If you do not, your CloudStick will not be able to access these files to view them in the app or save them on your CloudStick.
MP3, MP4, AVI, MOV, WAV, JPG, PNG, PDF, GIF
The CloudStick will pull all image, video and audio files from the different apps on your phone or tablet that store these types of files. For example: Podcasts will be pulled from the “Podcasts” app, photos will be pulled from the “Gallery” app, and more.
No. The CloudStick app creates a copy of the files you choose and saves the copy to your CloudStick. The original files will all still be on your phone or tablet where you can delete them later if you choose.
No. To delete files from your device, you have to go into the app on your device that is storing the original files.
If when you open your PocketCloud app, you see the words “Not Connected” or the Browse PocketCloud icon is greyed out, here are some actions you can take to reconnect:
• (Android Only) Clear Cache: Tap the menu button in the top right corner of the home screen. Tap “Clear Cache”.
• Refresh the connection: Tap the menu button in the top right corner of the home screen. Tap “Refresh”.
• Restart the app: Force close and re-open the PocketCloud app.
• Reconnect the WiFi: Enter your WiFi settings and disconnect from the CloudStick WiFi. Turn the WiFi off for about a minute and then turn it back on. Re-connect to the CloudStick WiFi (See Advanced Section 1C to learn how).
• Open the PocketCloud app.
• Tap the menu button in the top right corner of the home page.
• Tap “Change Password” to change the WiFi password of your CloudStick.
• You will have to enter your old password as well as the new password.
• Tap “Done”.
• If you have forgotten your password, you can reset it to the default password. (See Advanced Section 1E to learn how.)
While your CloudStick is in Transfer Mode, you will be able to open the PocketCloud app on your device but you will not be able to use it. It will not function as normal and will not let you view the files that are saved on the CloudStick.
• You can only be in one mode at a time. Switch from WiFi Mode to Transfer Mode by plugging your CloudStick into a computer and pressing the power button once. The Transfer Mode light will illuminate white.
• To switch from Transfer Mode back to WiFi Mode while your CloudStick is plugged in, press the power button once again. The Transfer Mode light will turn off.
• Once you unplug the CloudStick from your computer, it will automatically switch back to WiFi Mode.


